Knowing how to Delta shower faucet assembly is a useful piece of knowledge to hold. There follows a guide on the best way to put shower faucets into place and get the best use of it. Follow these tips and assembling the shower faucet will pose no problems for you.
The Delta shower faucet once assembled will provide you with a powerful stream of water, which will provide an invigorating and refreshing washing experience.
Delta is a company well known for providing high-quality bathroom parts and appliances at prices that represent great value for money. They have over a thousand bath and shower fittings to choose from and all items come with fitting instructions, and specifications to allow you to buy the most suitable parts for your shower.
Delta provides guides on how to fit faucets in sinks baths and also for showers, with manuals for every type of faucet, which they sell.
When you opt to use their products you can rely on things working as they should do. Delta will include all the things needed to install or assemble a shower including screws and Allen wrenches. Most people that will attempt to assemble their own shower faucets will already have screwdrivers, Teflon tape, and a soldering iron.
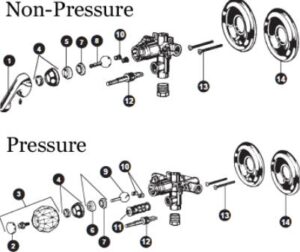
How to Assemble the Shower Faucet / Replace the Old Cartridge?
- First of all, you will need to turn off the water supply to avoid getting wet.
- Then completely remove the unwanted cartridge and the other parts still connected to it, unless it has a wall mounting the plaster guard and the screen will have to move out of the way to allow installation.
- Turn the new cartridge until you can see “hot side” to your left, then use the O rings at the end of the cartridge to make sure it is securely connected to the whole unit.
- Once it is in place use the bonnet nut to keep it that way.
- Guide to fitting a new showerhead or tub spout.
- To begin with, connect the shower arm to the flange, keeping them in place with Teflon tape to avoid tightening the showerhead too much.
- When the tub spout has to fit using a slip-on installation process a 1/2 nominal copper tube must be used for that installation to work making sure it stays put by attaching with a screw.
- If the spout needs to be attached to an iron pipe then tape to the pipe using Teflon tape and secure by screwing together at the pipe nipple.
- For a copper sweat installation, you will need to solder the spout to the copper pipe after carefully removing the O ring, tighten the spout gently by hand until it is against the bathroom wall.
How to Install the Trim?
* Guide the O ring over the bonnet nut and the faucet, it should rest just at the rear of the nut.
* Some models need a spacer, if yours does then insert it between the cartridge and the nut, place the sleeve over the top of the faucet and also the O ring.
* Some models require that you screw the escutcheon to the backplate, Delta supply 2 extra screws if it needs to be done.
* Finally fix the handle on to the stem, this needs to be tightened using the Allen wrench included with the product.
Having no trim yet? Here are Delta shower trims that you can choose from:
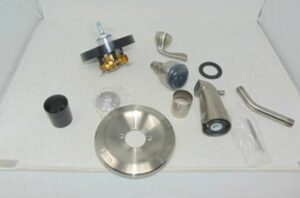
The Parts Needed For Shower Faucet Assembly:
* A faucet including all screws and instructions
* The tools to attach everything together like a screwdriver and soldering iron
* A roll of Teflon tape will come in hand
* An Allen wrench as supplied by Delta
* Make sure to check the specifications on the Delta website to make sure you purchase the most suitable product
Need New Parts? No Problem!
Should any part of the Delta shower faucet need to be replaced then simply buy a new part. Then repeat parts of the above process to fit the new part precisely where it needs to go.
There will be no problem in obtaining new faucets and other parts from Delta, either directly or from other sellers. Delta products are widely available both online and in-store.
Get the manual
Manuals are widely available for Delta products, either in paper format or electronically in pdf format. These can be obtained from Delta directly or from plumbing and DIY sites and blogs.
Generally, the workflow for assembling a shower faucet is similar to the ones given here, though there will be slight variations depending on the specific Delta product you have purchased.
Do not get stuck, watch a video
Some people find it easier to learn what to do by watching videos instead of reading blogs or instruction manuals. There is bound to be a video online showing you how to assemble the specific Delta shower faucet, which you have to fit or replace.
A quick search should soon find you the exact video that covers the Delta product you have just purchased or need to buy.
Conclusion
It is relatively straightforward to assemble a Delta shower faucet providing that you have some basic skills, some useful gear, and tools while following the tips provided.
There is a very wide selection of Delta shower faucets, which you can assemble in your bathroom. Whether it is to install a shower and faucet for the first time or to replace an existing one the process is generally a simple one. Providing you have a screwdriver, Teflon tape, and a soldering iron you will be ready to assemble a Delta shower faucet. Sometimes, an Allen wrench may be needed, yet that comes supplied with the faucet or showerhead, so you do not even need to have one in your tool kit.
The workflow is easy to follow, the Delta shower faucets are of high quality with there being widely available manuals and video guides if you have any problems when assembling your Delta shower faucet.