Removing a shower handle can be a little difficult, especially if you don’t have the right tools. If you’re like most people, you probably don’t have all of the tools that would make this job easier. The good news is that there are plenty of ways to remove a shower handle without using any screws!
In this article, we’ll show you how to remove your shower handle within a few minutes with simple tools.
Why Do You Need to Remove Your Shower Handle?
There are several reasons why you might want to remove the handle of your shower.
Here are some of them:
1. The first reason you need to get rid of your shower handle is that it can create lots of dirt and grime inside your home if it is not cleaned thoroughly.
2. You might also need to replace it because of a leak.
3. If it is broken.
4. If it is not working properly.
5. If you are replacing your shower so that the new parts fit better and last longer.
6. They are too old and have been used by many people already.
7. If you want to change its design or color because it doesn’t fit well with your overall bathroom design.
Recommend reading: 8 Possible Reason Why Do I Sneeze After a Shower & Effective Solutions
What Style is Your Shower Handle?
If you are looking for a replacement shower faucet handle, it’s important first to know what style of handle you have. This guide will help identify what type of faucet handle you have so that you can find the correct replacement part.
There are three basic types of shower handles, knob handles, lever handles, and cross handles. Each of them is available in a variety of styles and finishes.
Let’s discuss each of them:
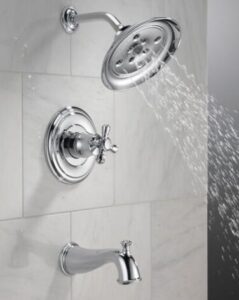
1. Knob handles
(Click the image to check the knob handle replacement kit)
The most common type of shower handle is the knob style. It allows the turning on and off of water conveniently with just one hand.
They’re simple to install, easy to use, and come in a wide range of styles and finishes. They’re also typically the least expensive option.
Knob handles are usually round but maybe oval. They usually have a threaded spindle that connects to a cartridge or valve.
They may also be connected to a ball handle. With this type of handle, you must turn the knob counterclockwise to turn on the water and clockwise to turn it off. These handles are typically made from either metal or plastic.
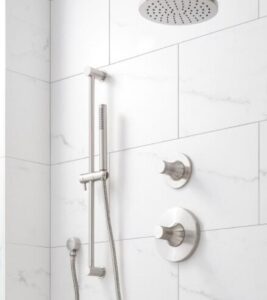
2. Cross handles
(Click the image to check cross handle shower system)
These traditionally styled handles are a good choice if you want a more formal look.
A cross-shaped handle is commonly used in both residential and commercial applications.
Cross handles are available in a variety of classic and contemporary styles and finishes, including polished brass and chrome. Although they’re not as common as knob handles, many can be installed with your existing valve stem and plumbing connections.
The cross shape allows the water to be turned on or off with either one hand or both hands.
3. Lever handles
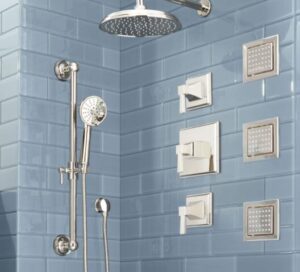
(Click the image to check the lever handle shower system)
Like knob handles, this type has a threaded spindle that connects to either a cartridge or valve system inside the faucet body.
Some lever-style handles can be installed on knob-handle faucets by simply unscrewing the knob and screwing on the lever handle in its place.
These ergonomically designed handles require less effort to operate than knob or cross handles. Lever handles are available in a variety of styles, including polished brass and chrome, so you’ll have no trouble finding one that coordinates with the rest of your bath hardware.
Recommend reading: Top 10 Best Rain Shower Head Reviews
How to Remove Shower Handle Without Screws?
Before you can remove your shower handle without screws, there are certain tools you will need. You need to make sure that you have these tools ready before starting the task.
Here is a list of the tools you need:
1. Allen wrenches
2. Pieces of cloth or hand towel
3. Hex key set
4. Distilled white vinegar (optional)
5. Flathead screwdriver
6. A handle puller set (optional)
7. Adjustable wrench
8. Rust cleaner or lubricant (optional)
Here is a step-by-step guide on how to remove the shower handle without screws:
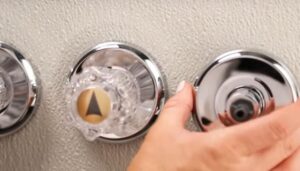
1. The first thing you should do is locate your shower handles and then turn off the water at its source.
2. Remove the handle by loosening it with a small screwdriver. Be careful not to damage the surface of the handle or the tile.
3. Unscrew and remove the escutcheon plate; this reveals a set of screws that hold together the faucet body and handle the base plate.
4. Loosen these screws with a screwdriver and remove any washers or other debris that may have accumulated behind them. The screws may require pliers or other tools to loosen if they are rusted in place or otherwise difficult to turn.
5. Remove the faucet body from the wall, exposing the valve stem attached to a pipe in the wall by one or two nuts holding it in place at either end of the valve stem.
6. Loosen these nuts with an adjustable wrench, then lift out the valve stem, allowing access to the inside of your pipes for cleaning if necessary and allowing you to attach a new valve stem without having to remove them from an inaccessible location behind your shower tiles.
7. After removing your shower handle, try applying rust cleaner or distilled white vinegar before replacing your handle.
8. Repeat this process if you have a double faucet.
If you are still having trouble removing your shower handle, we recommend that you call a plumber.
Recommend reading: How Long Does A Hot Shower Raise Your Body Temperature?
How to Remove Multiple Shower Handles?
If your shower faucet has two handles, it is referred to as a double-handle or stem faucet or multiple shower handles. If you have double or multiple shower handles and you want to remove them, you need first to check if the shower faucet is a washerless faucet or a compression faucet.
Here are the steps you will follow if you want to remove multiple shower handles:
1. Turn off the water shutoff valve close to the shower.
2. Get rid of the decorative caps that are located on the handles by positioning the edge of a screwdriver under the edge of the caps and popping them off. Use your screwdriver to turn the screws in the middle of the handles counterclockwise and raise the handles off the faucet.
3. Gently wrap a piece of friction tape around the packing nuts at the surface of the stems where the handles were pulled out from. Hold the packing nuts with a pair of pliers and turn them counterclockwise to get rid of them.
4. The next thing you should do is slide the shower handles over the stems and turn the handles counterclockwise until the stems become loose. If the stems refuse to loosen up, hold them with the pliers and turn them counterclockwise until they get loose.
5. Check the stems. If you notice that the stems have a diaphragm or a cartridge, it is a compression faucet. But if there are washers, it is a washer-type faucet.
For compression faucets
Follow these steps if they are compression faucets.
1. Turn the screws located beneath the stems counterclockwise to get rid of them. If the screws refuse to turn, apply some amount of lubricating oil to the screws. Then, get rid of them using a screwdriver.
2. Get rid of the washers beneath the stems by turning them clockwise to pull them from the threads of the washer screws.
3. Pull the faucet’s cover plate away from the wall to get rid of it.
For washerless faucets
1. There are screws holding the upper discs on the cartridges; get rid of them by using a screwdriver and removing the discs.
2. Move the cartridge bodies up and off the stem.
3. Then, raise the water inlet seals under the cartridges to get rid of them.
4. After that, remove the faucet’s cover plate away from the wall to get rid of it.
Recommend reading: Why Can’t You Shower After Cupping?
How to Remove a Shower Handle with Hidden Screws?
1. Start by turning off your water supply.
2. Get rid of the faceplate. You can do this by using a cloth or hand towel and twisting it off or if your faceplate has a bolt, use an adjustable wrench to get rid of it.
3. Check the inside of your shower handle. You are free to use distilled white vinegar to clean any parts.
4. Look for the hidden screws that are attached to your shower handle. If your shower has lever handles, you will need Allen wrenches or hex keys to get rid of them.
5. The next thing you need to do is use a screwdriver, Allen wrench, or hex key to get rid of your shower handles, bolts, or screws.
6. Make sure you loosen the screws or bolts carefully because they are very tiny.
7. Monitor how the handle was assembled so it won’t be difficult for you to fix them back during reinstallation.
8. After removing the bolts or screws, the shower handle becomes very easy to remove with your hand.
9. Repeat this same process if you have a double faucet handle.
Recommend reading: The Best Dual Shower Head For Your Bathroom – Newly Updated
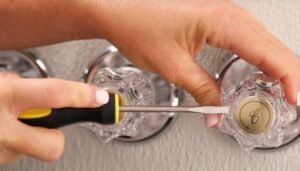
How to Remove a Shower Handle with Screws?
To remove a shower handle with screws, you will need a flat-head screwdriver, a plier, and a wrench.
These are the steps you should follow:
1. Turn off the water on the shower handle. You should be able to do this by turning the water off at the valve itself.
2. Use a flat-head screwdriver to pry up the cap that covers the screw on your shower handle. This will usually be a decorative cap of some kind, so it should pop right off once you get it loose.
3. Remove the screw with the screwdriver. Don’t try to use pliers or any other tool for this part; you may strip or damage the screw.
4. Use pliers to grab onto the end of your shower handle and pull it straight out from the wall. Use a wrench to unscrew any fittings that hold the handle in place. When all of these are removed, pull on the handle until it comes out completely.
Recommend reading: FAST and EASY Way to Raise Your Shower Head
FAQs
1. How to remove the Delta shower handle with no set screw?
There is a small plastic cap that pops off on the Delta shower handles. This cap covers a set screw that you will need to remove to take the handle off.
If you don’t have a set screw, grab some pliers and grab the handle firmly. Then wiggle and pull up at the same time. It should pop off pretty easily. If you’re working with plastic, try soaking it in white vinegar for about 10 minutes to soften up any calcium deposits that might be holding it on.
Then use the pliers again to pull it off. You may have to do this a few times if it’s stuck on there.
2. How to remove a rusted screw from the shower handle?
Before removing the rusted screw, make sure you wear gloves, safety glasses, and a mask, so you don’t breathe in rust particles.
After doing that, turn off the water supply in your bathroom.
There are different ways to remove rusted screws from your shower handle; we will show you you can use WD-40 to do it.
Apply some amount of WD-40 on the rusty screw so it can help loosen things up for you to remove it easily. Coat the rusty screw with WD-40 (a lubricant) and allow it to sit for some minutes. Then, try removing the screw with an Allen wrench or a screwdriver or Allen wrench.
3. How to remove stuck shower handle screws?
If you want to get rid of a stuck shower handle screw, the first thing you need to do is look for the screw that got stuck.
Use a hammer to tap the surface of the screw. In the process of doing this, wedge a screwdriver to one side of the screw. It will help you pull the screw out gently. You could apply lubricant to help loosen the screw before you begin.
4. How to remove a stripped screw from a shower handle?
There are several ways you can remove a stripped screw from a shower handle. We will show you how you can use a flat head screwdriver to do that.
Let’s get started:
Most of the screws used in household appliances either have a Phillips head or Allen’s head. If your shower handle has Phillips screws, you will need a handy flathead screwdriver to remove the stripped screw.
To remove the stripped screw, use the flathead screwdriver to grasp the Phillips screw.
Then, press the flathead screwdriver hard on the screw when you feel a grip and turn it counterclockwise. This will help loosen the screw. And that’s all. Ensure you wear gloves and safety glasses before doing this.
5. How to remove the Kohler shower handle without a screw?
Step1: Use a screwdriver to remove the decorative cap.
Step 2: Insert the Allen wrench into the hole, turning counterclockwise to loosen the set screw.
Step 3: Pull off the handle.
Step 4: Use a flathead screwdriver to remove the cam, packing, and bearing plate.
Step 5: Slide off the spindle assembly from the valve stem.
6. How to remove the Moen shower handle without screws?
To remove a Moen shower handle without screws:
1. Remove the screw cap on top of the handle.
2. Insert a 1/8-inch Allen wrench into the hole you revealed when you removed the cap.
3. Push down on the Allen wrench and turn counterclockwise until the handle is loose.
4. Remove the handle from the valve assembly.
Recommend reading: Top 6 Best Shower Head for Low Water Pressure Reviews
Conclusion
If you’re replacing the handle of your shower faucet because it’s broken or the finish is worn, you don’t need any special tools to remove it. A wrench and a screwdriver are all you need to accomplish this task in less than an hour.
Do well to try out the steps we outlined in this article, and you will see how easy it is to remove shower handles regardless of their type or level of damage.
Recommend reading: Top 6 Best Handheld Shower Heads On The Market