If you love a quality shower faucet, you know you can rely on Delta. Delta manufactures meticulous shower faucets for both residential and commercial use. But what happens when you need to replace your Delta shower faucet? Although Delta provides faucets that are robust and long-lasting, they will come a time when you need to replace yours.
In this article, we are going to take a look at how and when to replace your Delta shower faucet. You have two options available to them. You can either bring in the services of a local plumber or you can try the DIY method. The great news is that with some basic tools and a little know-how, replacing your faucet is possible without making too much of a mess!
How to Replace Delta Shower Faucet All By Yourself?
If you are on a tight budget, DIY replacement of your Delta Shower Faucet maybe your best option. Before you get started, however, you need to take some time to prepare yourself. Familiarizing yourself with the different parts of your shower faucet is a must. There are various different faucet models available, so it is essential that you purchase the correct one. If you are in any doubt of the model number of your shower faucet, consult the official delta website here. This way you will get an idea of the replacement parts that you will need.
Preparations Before Replacing
Before you get started with the replacement of your shower faucet, turn off the water supply. It is preferable that you turn off the water supply to your entire property and not just to your bathroom. So ensure you are not running a dishwasher or washing machine at the time.
Open up your bathroom taps and your shower faucet after turning off the water supply to ensure you get rid of any water left in the pipes and to normalize the pressure.
Next, cover over the drain in your shower, and any other drains such as your sink. This will ensure you don’t lose any bolts, nuts, or small screws down the drain.
Delta 1300/1400 Series
As you are well aware after consulting the Delta website to make sure you know which model you are dealing with, there are different series of shower faucets available. In this section, we will look at how to replace the 1300/1400 series faucet. The entire process should only take you are twenty minutes:
Step 1
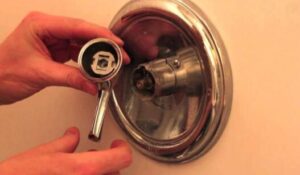
Firstly, use an Allan wrench to loosen the setscrews and remove the faucet handle. Once you have loosened the setscrews, the handle of your faucet should simply pull out.
Once you have removed the handle of your Delta shower faucet, now remove the trim sleeve and spacer. This can be achieved by simply pulling them out
On removal of the spacer and trim sleeve, there will not be a bonnet nut visible. This can now be removed using a strap wrench.
Step 2
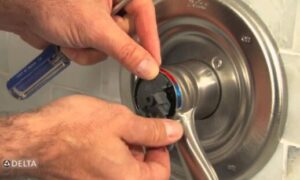
The next stage involves removing the cartridge, this being the most crucial stage of your shower faucet replacement. The cartridge can be removed by pulling it out. If it is not moving, wiggle it around a bit until it becomes loose. When you remove the cartridge, any water that was left in the valves will be released.
Depending on the model of cartridge you have, your replacement will either be white or gray in color. Make sure that you have the correct cartridge to hand at this stage.
Memorize the markings on the new cartridge and install it with the side marked as hot to the left. (On the majority of faucets, the hot side will be on the left-hand side)
Step 3
Once your new cartridge is in place, start reassembling your faucet in reverse order, starting with the bonnet nut; you can use all new parts or use the old pieces to reassemble your shower.
Delta 1700 Series Faucets
The newest of Delta shower faucets are the 1700 series. The process of replacing is a 1700 series faucet that is very similar to the process used for replacing 1300/1400 faucets. The stages for replacing a Delta 1700 series faucet are as follows:
Step 1
Firstly, remove the knob of the faucet, taking out the cover, and then removing the temperature control knob.
Once you have removed these parts you will find the handle assembly underneath. The handle sleeve needs to be slid off, and once removed you need to remove the trim sleeve in order to access the cartridge.
With the cartridge assembly now visible, remove the bonnet nut. This can be done by using either a wrench or lock pliers. The bonnet nut can be loosened by turning it anti-clockwise with the wrench or pliers. Once it is loose, you can take the nut out by hand.
Step 2
Now, refer back to steps four to seven of the 1300/1400 Delta shower faucet replacement, repeating the steps in the same order to remove and replace the cartridge and reassemble your faucet in reverse order.
If the reason for replacing your 1700 series Delta Faucet is because of a leak, you may need to check the spring, seats, or seals. If replacing the cartridge doesn’t stop the leak, look for the spring, seal, and seats located behind the cartridge and on a valve adapter.
In order to replace the valve adapter of your 1700 series faucet, firstly loosen the screw that is holding it in place and then pull the adapter out with nose pliers. Once you have managed to remove the adapter, replace it with the new one, and then reassemble the cartridge and the faucet in reverse order.
When Tackling a DIY Replacement, Always Remember the Following
- Have all the tools and replacement parts you need to hand.
- Close off the water supply before you start and cover drain coverings to ensure you don’t lose any small nuts or bolts.
- Delta Shower Faucets are renowned for lasting for many years, and a correct DIY or professional replacement cartridge for your faucet will ensure you carry on enjoying your Delta Shower for longer.
Conclusion
You can find out more about replacing your Delta Shower Faucet by watching videos found online such as this one. Amazon sells a large number of replacement parts for your Delta shower faucet, and it is possible to make a saving when you shop here for your replacement parts.
If you are unsure about how to replace your shower faucet and are not comfortable with a DIY replacement, even after watching the videos available online, call in a professional plumber for the job. The entire job of replacing your faucet will take less than one hour, and is therefore an affordable job that will ensure the best and most professional results.


