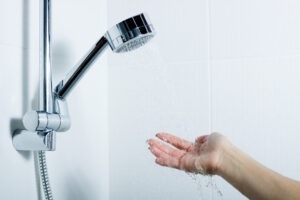
Are you looking forward to conserving water? Well, one of the solutions is to install a shower head flow restrictor. But sometimes, these flow restrictors could compromise efficiency, and removing them becomes the only solution.
Understanding how and when to remove them will always ensure that you make logical decisions. Here are a few insights into this.
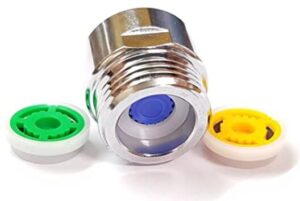
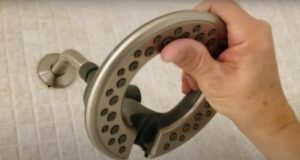
What Does a Flow Restrictor Look Like?
A shower head flow restrictor is a relatively small device inserted in the showerhead. Its plastic construction and circular shape will always stand out. It is flat and comes with a star-shaped metal center.
You will readily fall in love with how these small devices appear. They come in various colors, allowing you to choose whichever pleases your eye. They also come with open inserts relatively close to the edges.
Usually, you insert this flow restrictor at the hose’s edge, at the point where it attaches to the flexible hose. It could also be behind the showerhead or at the bottom of the hose.
Recommend reading: The Best Delta Gold Shower Head Reviews
What is a Water Flow Restrictor Used For?
You can barely overlook the essence of any device before buying it. Usually, installing a water restrictor helps improve your water flow. Its role in conserving this water remains astounding too.
This restrictor reduces the water flow to specific rates, often in gallons per minute. You can also rely on it to keep the water pressure in check. Its installation suffices if there is too much water wastage. However, once things get streamlined, you will be free to remove them.
Recommend reading: Top 9 Best Thermostatic Bar Mixer Shower Reviews
What to Consider Before Removing a Flow Restrictor?
You cannot overlook the importance of water flow restrictors in conserving water. However, they can pose various compromises, prompting you to consider their removal. Usually, the following will be some of the most critical reasons to remove these restrictors.
-
Installment Site
The installation of flow restrictors often depends on the type of showerhead. That means the point of installation varies from one type to another.
Installing your restrictor in the wrong place can result in a faulty showerhead altogether. It could also cause excessive leakage, exposing you to significant water bills.
As long as it has been fixed in the wrong place, you are free to remove it.
-
Types
Different showerheads require different removal skills. For instance, you do not follow the same procedure when removing this restrictor from a handheld showerhead and when doing it on an embedded one.
Take the time to understand what skills you need when handling specific types of flow restrictors too. While some will require professional help, some are straightforward.
-
Causes for removal
Take the time to understand why you have to remove your flow restrictor. Is this restrictor faulty, or has it failed to conserve water? From efficiency to convenience issues, establish the demerits of having that flow restrictor.
For instance, a slow flow or excessive leakage could be a significant problem. If you are having these issues, it would be best to remove the restrictor.
Recommend reading: The 20+ Best Delta Shower Faucets Reviews
How to Remove the Restrictor Valve?
This process is relatively straightforward. It is crucial that you first get all the tools and materials necessary before you start. Ensure that you have a towel, paper clip, adjustable wrench, and screwdrivers. You will also need plumbers’ tape and needle-nose pliers. After that, follow these steps.
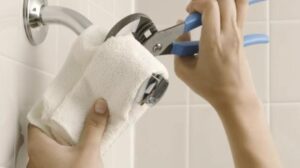
Step 1: Disconnect the showerhead
Take the time to disconnect the showerhead from its arm pipe. Unscrew this pipe from the wall, whether by hand or using a wrench. Unscrewing takes an anti-clockwise movement. Ensure that you wrap a cloth around the showerhead and tighten the nut.
Step 2: Remove the shower screen
Your showerhead might have a shower screen, a mesh screen that helps trap impurities or sediment in the water. If your showerhead has one, ensure that you remove it, but carefully so. Gently tap on the showerhead, as this will ensure it comes off softly. You could also rely on needle-nose pliers to smoothen this process.
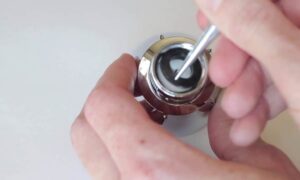
Step 3: Get the gasket off
Whether it is an O-ring or a gasket, ensure that you remove it. It is at this point that you will need a paperclip to unbend and pry out the O-ring.
Step 4: Remove the flow restrictor
Once you remove the O-ring or gasket, you will see a star-shaped plastic or metal flow restrictor. It is usually in a plastic ring. Use your paper clip to twist and remove this flow restrictor. Ensure that you do this carefully, lest you damage the remaining parts.
Step 5: Return the O-ring
Once you remove the flow restrictor, replace the O-ring and the shower screen you previously removed. But before that, you could clean and lubricate this shower screen. From scale and gunk to impurities, remove anything that could compromise the efficiency of your shower. Soaking it in vinegar can help.
Step 6: Put back the showerhead
Please take off the tape on the showerhead and clean it. Usually, you will need a clean yet damp cloth to remove any stubborn deposits on the sides. You will then apply new tape on the threads of your shower arm. Feel free to use a few layers, improving the seal. Screw your showerhead back in a clockwise motion. However, ensure that you do not make it way too tight.
Recommend reading: Top 5 Best Bar Shower Reviews
How to Remove a Flow Restrictor From an Embedded Showerhead?
This process is relatively different from the previous one, thanks to the design featured by embedded showerheads. The tools you need will include a pipe wrench, cloth, paper clips, Teflon tape, and needle-nose pliers. Once you are set, consider the following steps.
Step 1: Remove the showerhead
The first step is removing the head. It would be best if you focused on the connector nut and the shower arm. Wrap these parts with a clean rag, and firmly hold the arm. Usually, you will unscrew it in a counter-clockwise motion. Using a wrench will often ensure that the process is smooth, and it takes a much shorter time.
Step 2: Remove the restrictor
Carefully look into the connector nut and locate the washer in it. This washer helps tighten and secure the mesh shower screen. It is only after you remove these items that you will identify the flow restrictor. Using your needle-nose pliers, gently remove the washer and tap on the bottom of the showerhead. This tapping will ensure that the screen comes off smoothly.
You will then use a screwdriver to remove the flow restrictor. This restrictor is usually plastic and can come in multiple colors. It could be green, red, blue, white, or pink
Step 3: Set up your head
Once you remove the flow restrictor, you will need to replace all the items you removed, one by one. Ensure that you return the shower screen and install the washer. This washer should be tight enough to cushion it from falling.
You will then have to wrap new Teflon tape on the threads, which helps the showerhead be secure. Further, you will also need to secure the connector, preferably using an adjustable wrench. However, be careful not to make it way too tight, as it could break the showerhead in the long run.
Recommend reading: Top 9 Best Handheld Shower Head with High Water Pressure Reviews & How To Choose
Steps on Removing a Handheld Showerhead
Sometimes, you will find it more useful not to have a handheld showerhead. Or perhaps you want a change. Usually, such will be the time to remove it. Ensure that you have all the necessary items, including an adjustable wrench and Teflon tape. Here are the steps you need to consider in this pursuit.
Step 1: Ensure that all your water faucets in the bathroom are off. That should not mean that you turn off the entire water supply in the house.
Step 2: Ensure that you protect your connector’s finish, preferably using a clean rag or piece of cloth.
Step 3: Remove the nut, which is often in a counter-clockwise motion. However, be careful not to compromise the washer between the holder and the hose.
Step 4: Twist the handheld shower in a counter-clockwise motion, releasing it from the arm. You can rely on your pliers at this point.
Step 5: Clean the showerhead, and you will be good to go.
Recommend reading: The 20+ Best Delta Shower Faucets Reviews
Steps on Removing Moen Showerheads
Do you have a Moen showerhead? The process of removing this showerhead is relatively straightforward. As long as you understand the procedure to follow, you will have no reason to worry. Here is what to do when in this pursuit.
Step 1: Using your hands, firmly hold the showerhead or the connecting nut, depending on which model you have.
Step 2: Ensure that you turn the showerhead counter-clockwise, gently yet firmly. If you are looking for more leverage, it would be best to hold the showerhead and the connecting nut using both hands.
If this approach fails, mostly because the showerhead is too tight, a few supplies will suffice. Get yourself an adjustable wrench or pliers. From there, follow these.
Step 3: Cover your wrench with a protective piece of cloth
Step 4: Grip the connection, ideally by tightening the adjustable wrench
Step 5: Turn it counter-clockwise and remove the Moen showerhead
Once you remove the showerhead, it would be right to clean it with vinegar. It helps remove all impurities without affecting its integrity.
Recommend reading: The 6 Best Delta In2ition Shower Head Reviews with Advanced Technology
Steps on Removing Waterpik Showerheads
Removing Waterpik showerheads is one of the most straightforward processes. Usually, you will barely require any additional tools or equipment. Unless the showerhead is way too tight, your hands will be enough to remove it. Here are the steps you need to follow in this pursuit.
Step 1: Take the time to clean the top of the showerhead gently
Step 2: Take hold of your showerhead, and firmly so. You could also consider gripping the connecting nut in some models or design
Step 3: Gently unscrew the showerhead from the connector. Usually, you will have to turn it in a counter-clockwise motion
Step 4: If the showerhead seems a little too tight, you can consider using both hands. However, be careful not to force the movement way too much. That is because the showerhead could break.
Step 5: If the showerhead fails to get off, get yourself an adjustable wrench or pliers
Step 6: Cover this wrench with a rag, protecting the fitting and where the connecting nut is
Step 7: Tighten the wrench and turn it counter-clockwise. This move will be enough to unscrew your showerhead in the long run
Recommend reading: Best Overhead Shower Head Reviews
Steps on Removing Delta Showerheads
There is no denying that Delta showerheads are some of the most popular options in the market. Removing or replacing them is reasonably straightforward. Usually, with the right tools, this process takes a few minutes. Here are the steps you need to follow in this regard.
Step 1: You will start by turning the ring piece on your showerhead. Keep turning it in a counter-clockwise motion until it can comfortably come off
Step 2: Wrap a clean rag around this showerhead.
Step 3: Clamp your pipe wrench 0over this piece, but keeping the cloth between the ring and the wrench
Step 4: Take the time to turn your adjustable wrench counter-clockwise to unscrew the showerhead
Step 5: You could spray some lubricant on the showerhead to make the process more seamless
Step 6: Peel off any Teflon tape once you remove the showerhead
While turning your wrench, always ensure that you do it gently. It will help avoid breaking or damaging the showerhead and the items around it.
Recommend reading: How to Install A Shower Head With Hose?
Water Control Settings in Modern Showerheads

Recently, many brands have chosen to improve the technology used in making modern showerheads. Water control settings have become a priority, cushioning users against too much wastage. Some of the control settings will include the following.
-
Pressure control
This aspect helps keep the water pressure in check. The pressure remains steady throughout the period you will use the shower.
-
Temperature control
This setting helps keep the temperature within the preferred ranges. It ensures that you do not end up scorching your skin in the long run. It also provides you with a spa-like experience.
Recommend reading: Top 10 Best Shower Head and Hand Shower Combo Reviews
Conclusion
In conclusion, you cannot overlook the significance of flow restrictors in showerheads. However, once they start compromising your convenience and comfort, it will be best to remove them. The insights provided above ensure that this removal process is steadfast and seamless. Try it today!
Recommend reading: Top 9 Best Thermostatic Bar Mixer Shower Reviews