Have you ever thought of fitting a shower outlet in your bathroom? Proper fixing of this outlet will bring some unique comfort and supreme shower experiences to you and your family. The experience is fantastic as compared to taking a shower in the old, outdated bathtub. A delta shower faucet installation is undoubtedly a simple process that, if followed accordingly, will bring out the intended feeling.
What to Note Before Installing the Delta Shower Faucet?
Firstly, if you plan to install the shower faucet yourself, read the faucet instructional manual thoroughly and understand it.
Ensure that you have all the shower faucet accessories so that you will not stop at some point.
a)These materials are PEX tubing, a faucet and showerhead, drop-ear elbow, four female threaded adapters for the pipes, a board size of 2by4, Teflon tape, and a silicone sealant.
b)The tools required for the installation are an Allen key, a crimping tool, a hole saw, electric screwdriver, adjustable wrench, hammer, screwdriver, screws, measuring tape, slip joint pliers, and a pencil to help in marking points.
Some technical indoor installations may require an experienced plumber to ensure proper installation and fitting of the gadgets. Proper fixing will offer quality, long-lasting, and reliable services to any user. A delta shower faucet installation is no different from any other setup.
Types of Delta Shower Faucets Available in the Market
Depending on the bathroom space in your house and your budget, the shower faucets are available in various types. The taps are classifiable on the valves you use, bathtubs, the number of handles that you prefer, the shower heads in your bathroom, and the handles you want.
1. Based on valves
This type of Delta shower faucets uses a shower component that is always on the wall called a valve. Their performance and lifespan depend directly on the quality standard of the valve. There two different types of delta valve faucets in the market.
Thermostatic valves
The Delta faucet with thermostatic valves uses a system that enables the faucet to control water temperature. With this ability, you can control and adjust your water to the desired temperature. Also, these thermostatic valves can control and regulate the flow of your water on each outlet, allowing it to have a separate control system. As a result, you enjoy a better showering experience in your bathroom.


Pressure valves
The pressure valves allow the user to balance and control the pressure of your water on every outlet. With the help of a spring gasket as stoppers, the water remains in one pipe and cannot move into another. As a result, it protects either cold or hot water from escaping, thus balancing the water’s temperature.

2. Number of handles
There are two types of delta shower faucets in the market that uses the number of handles as an identification parameter.
Single handle
These shower faucets are among the most popular in the market. With their design, the water flow with ease, and adjusting the temperature is possible.
Double handle
These shower faucets use more convectional designs; thus, it is less classy. The majority of these faucets come with diverters that serve as a third handle.

3. Showerheads
Many are times that users of delta shower faucets identify them using their showerhead. By using their showerhead features, Delta showerheads are classifiable into two categories.
Fixed shower
These shower faucets are mountable on the walls and ceiling of your bathrooms. To control the flow of your water, you can swivel the showerhead at 180 degrees.

Handheld showers
Handheld showerheads, unlike other types of delta shower faucets, are known for their flexibility. As a result, it allows you to direct the water flow to a specific part of your body.

The following instructions typically guide the installation of any shower faucet.
Steps to Follow When Installing a Delta Shower Faucet
A professional plumber who has been licensed should adhere to the following simple steps that will leave your shower faucet functioning well to offer quality services as soon as it would get installed. Equally, if you are ambitious to install your own faucet Delta offers these tip-offs that are simple to follow and execute.
Step 1: Turn off the water supply
Before starting any plumbing process, ensure that the water supply gets turned off to reduce damages that would be accrued during the installation and also causing flood in the bathroom. Turning off can be done either at the cut-off shower valve inside the toilet or at the main water valve. It would be expected that there is already some water available for domestic use during the installation procedure.
Step 2: Identify the position from where the shower faucet will be fitted.
The shower faucet can get fixed on the bathroom drywall by making an opening a small part to get in the pipes using a hole saw, hammer, and a regular saw.
Step 3: Mark and measure the position from where the handle will be fixed
It is advisable to position the faucet handle so that even children will use it without straining. The ideal height that is suitable for every user is from 45 to 48 inches from the ground. The measuring tape and a pencil are used at this stage.
Secondly, measure the height of the showerhead and adjust it accordingly to be compatible with the handle. The standard height of the showerhead is usually 72 to 78 inches from the ground.
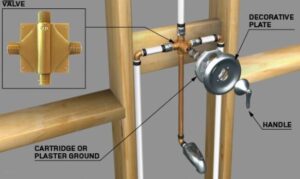
Step 4: Insert the horizontal knob.
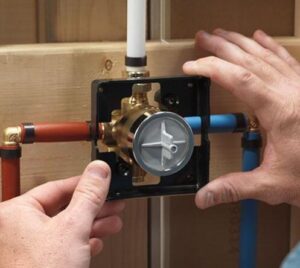
In this step, insert the knob upright between two horizontal ones that are already in place in the bathroom. A screwdriver comes in to fix it the knob in place. Ensure that the valve is solidly attached to avoid any probable moving. This vertical rivet will carry the pipe, and it should be stable enough. The place for the valve should come in such that the faucet will get positioned accordingly.
Step 5: Wrap up the adapters.
Use the Teflon tape to wrap the adapters, and once this is done, connect a hot water adapter to a hot water pipe with a wrench. Connect the adapters to pipes from left and right, depending on the position of the water supply. Positioning them well will allow cold and hot water to mix in the shower valve, going up to the showerhead.
The level should be used to make everything be at an equal position as you fix the valve to the knob. The electric screwdriver is used to attach the shower valve so that the marked UP indication will face the ceiling.
Step 6: Connect the vertical colon.
The PEX tube can now be fitted to UP indication on the valve, and it is easy to do so. Cover up the Teflon tape around the upper drop-ear elbow and attach it to the PEX pipe.
Step 7: Set a drop-ear elbow
Connect a PEX column to the drop-ear elbow using Teflon tape and connectors and rivet it down to the flat stud using an electric screwdriver to fix it. For accuracy, measure the distance between the perpendicular knobs and valve and then transfer the precise measures higher to a head shower stud.
Step 8: Drill holes
In this step, use a drill saw to bore holes for the shower handle and shower head after marking the positions. The drill saw makes holes precisely and does not inflict destruction on the ceramic tiles on the wall. When drilling, wear protective glasses to avoid unsafe elements entering into your eyes.
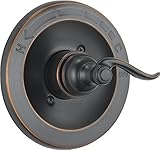
Step 9: Install the handle.
For this step, remove the protective part attached to the faucet and fix the decorative disc to the driver using the screwdriver. Insert and screw the handle adapter on the cartridge using the Allen key. Ensure that the handle is directed to the floor when water is off.
Step 10: Connect the fillets.
Use the Teflon tape to tie out the end of fillets of the higher opening for the drop-ear elbow. Connect the nets to the source tube of the drop-ear angle, and turn it moderately to ensure stable fixation.
Fill all holes with silicon sealant and cover them with beautiful places from the head shower set. It is now time to switch on the water back and enjoy the shower.
Conclusion
After the delta shower faucet installation, check that it works well by turning on the water to flow for a while to push out the air pressure within the faucet and enjoy a fresh hot or cold shower from the delta shower faucet.