Poor showerhead performance tends to reduce water discharge or uneven water sprays in your shower, and this can be a sign that your plumbing or fittings many have some sediment buildups clogging the spray holes, filter, or nozzles. Like 2-in-1 Delta showerheads, some brands are equipped with flow regulators and controllers to aid this, but they are also limited if your fittings are clogged. To bring your shower spray back to its normal operations/performance, you will be required to take apart a Delta rain showerhead and clean every part. This process is known as disassembling the system. Designers always design Delta showerheads with an easy and simple-to-disassemble routine so that most owners can always have a regular monitor and repairs without hiring a specialist.
Why Do You Need to Take Apart a Delta Rain Showerhead?
Disassembling your showerhead has a lot of benefits to your system; we will discuss some of the reasons as to why you need to have this routine in your home;
1 For Mold and Fungus Check-Ups
Fungus and molds are prone to moist places, and there is no place like your bathroom and shower systems with a lot of water in your home. It is recommended that you always have a regular cleaning routine in such places. Dismantling your showerheads help you to check if any molds and fungus have attacked your systems. Without forgetting the effect and health hazards, this bacteria can cause to your skin. It is approximated that 30% of reported skin irritation and other skin-related problems result from mold and other bacteria infestation.
2 Easy Cleaning
When conducting a regular cleaning, it is hard for you to reach inside your showerheads, which might lead to a serious infestation of molds or mineral buildups. Mineral buildups result from hard water from your source, which allows magnesium and calcium metal to stick inside the walls of your showerheads. This can affect your showerhead’s water discharge ability and also offer a bleeding site for bacteria. A random dismantle helps you reach for this place to scrub them off to avoid extra damages or water restrictions.
3 To Remove your Water Restrictor
Most showerheads are designed with a water restrictor, which is according to the water conservation act. This instructs showerhead designers to add a restrictor to all shower sprays in the market for water conservation. Many people tend to remove this extension in their system to enjoy a full water discharge. The best way to remove this part is by taking apart all the Delta showerheads parts by parts and eliminating this into your design. Besides, this process allows you to detect other defects in your shower system by allowing you to replace broken and other old fittings in your showerheads.
4 To Unblock the Blocked Nozzles
Unless you have a functioning water filter in your home; otherwise, you will be required to unblock your showerheads holes and nozzles. Most showerhead designers have a self-filtering system and which will block water from reaching the showerhead. And if you are experiencing a water shot or an inconsistency water supply, you need to dismantle your shower and clean all clogged nozzles.
How to Take Apart a Delta Rain Shower Head?
Designers of Delta rain showerheads have a better design that allows you to have a simple and easy disassemble procedure. But if you still doubt your instincts, here are some ideas on how you should conduct the whole thing.

Step 1 Protect the Fixture
Wrap a sizeable hand towel around the Delta showerhead, the collar nut, which connects the shower arm and the head spray. Ensure you have a copy of the angled connection that projects from the shower’s wall and the showerhead arm. By mastering this, you will protect your showerhead from a possible scratch or damages from your tools.
Step 2 Detach the Showerhead
Hold the shower arm with hand pliers or a pipe wrench and then grip the collar screw with a nose pliers pair. Turn your pliers counterclockwise to open or unscrew the screws. Grip the swivel ball or pivot nut with your pipe wrench and turn it counterclockwise to have a full and a free showerhead from the wall angled pipe. You can then remove your showerhead safely from its fitting.
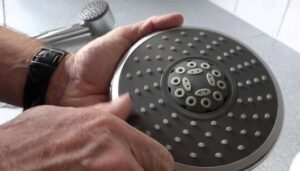
Step 3 Take it Apart and Troubleshoot
With procedure one and two complete, you can now reach inside the end of the delt showerhead with a hand or needle-nose pliers, a rubber washer, or a grip and then gently pull the whole system out. Remove the dirty filter or the water restrictor depending on your main aim of conducting this routine. Let’s take an example you wanted to remove a dirty filter, using a needle-nose plier, remove your filter, and look inside to confirm if the showerhead has a plastic disc with a metal slot that is a water restrictor or a water flow regulator.
To remove the water restrictor, gently wedge its awl tip located under the edge, apply a small downward pop and pressure to remove it. Some designers always design their showers in a way that you can remove these restrictors with your hand or equip it with a removable faceplate for easy removal. If your model has some screws on the faceplate’s front, simply unscrew the nuts and remove the plate.
Step 4 Clean
This task’s main aim is to clean your showerhead, soak your Delta showerhead in a warm solution of white vinegar with distilled water for 30 minutes, then wipe it to dry. If your showerhead still has some mineral deposits, you can use a soft brush or an old toothbrush to scrub them off. Wipe all the parts and reinstall them back to your shower system. It is recommended that you conduct this process once a month; you can consider doing it regularly if your main water supplier has no installed filters.
Recommended Delta Rain Shower Head If You Plan to Get A New One:


Conclusion
Having a look at your showerhead on a regular basis will help you reduce the chances at which molds and other fungi will grow in your shower. This also helps you to replace broken and old fittings in your system. The guide has discussed all you need to ensure that your bathroom is clean and safe for kids and pets.