The use of a handheld showerhead has brought about an improved everyday shower experience. Not only is it flexible and versatile, but it also offers comfort. You can create a spa-like experience where you direct water to the exact part you wish while bathing.
However, many shy away from installing the handheld showerhead since they view it as a project that can be done by professionals. On the brighter side, that’s not the case, since you can do the installation and enjoy the shower you crave at any time. Below we will discuss comprehensive details of installing a handheld showerhead.

Recommend reading: The Best Delta Gold Shower Head Reviews
Can I Install the Shower Head Myself?
Installing a shower head is an easy simple job to do as it’s a small project that does not require a fancy tool to work with. Although seemingly a small project, it has a massive impact. Below are steps on how to install a showerhead.
How to Install Handheld Shower Head with Different Fittings?
Step 1: Decide whether to keep the existing shower arm or not.
If it’s suitable according to your needs and style keep it but if it’s corroded or doesn’t match your room, scrap it. Ensure that the shower arms are compatible with the showerhead for smooth installation.
Step 2: This step applies when you decide to scrap off the existing shower arm.
Wrap the threads of a shower arm two to three times with Teflon seal tape. When applying, stretch the tape slightly. Turn the pipe into a wall fitting carefully and seal the wall opening with a plumber’s putty.
Later, slide the shower flange on top of the shower arm and then press it into your putty. To the excess putty, clean it with a rag.
Step 3: The type of shower head you bought determines the next step.
If attaching directly to the arm, use thread seal tape and wrap the thread at the base of the shower arm. Make sure to tighten it. Use your hands and be careful not to over-tighten them. If it is not as tight as required, use leather or heavy cloth with a wrench. Protecting it from finish damage.
Recommend reading: The 20+ Best Delta Shower Faucets Reviews
Three Types of Adapter Kits You Should Know.
For a handheld showerhead to be installed onto a spout it requires some special diverter fittings. Below are 3 adapter kits that can be used to install a handheld showerhead with a hose.
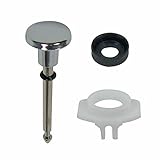
– A standard fitting.
This is a replacement of an old showerhead where it is attached to the shower arm with a flexible hose. Also replaces the handheld shower unit which functions as a handheld shower or a stationary head.
Recommend reading: Top 10 Best Bar Mixer Shower Reviews


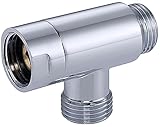
– A cross-tee diverter fitting.
With the inclusion of your hose together with your handheld showerhead unit, a cross-tee diverter works with the existing showerhead meant to work just like a secondary showerhead.
This diverter with a T-fitting has two outlets. The first one connects to the new handheld showerhead and a hose while the second one connects to the original showerhead.
Recommend reading: The 7 Best Delta Chrome Shower Head Reviews
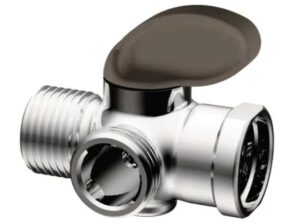
– A tub spout diverter valve.
This diverter is used mostly when there is an existing showerhead for starters. And you want to add a shower function. It will require that you replace an old tub spout with a new one that has a hand shower diverter.
Recommend reading: Top 6 Best Square Shower Head Reviews
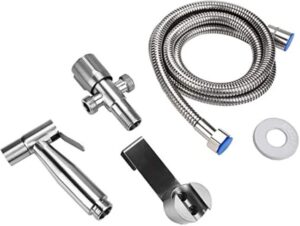
How to Add a Handheld Shower Head with Standard Fitting?
This comprises the methods used in connecting a handheld showerhead. Since it replaces an old showerhead, the handheld unit can either be screwed at the end of the shower arm. Or, fitting it to the bracket mounted on the wall depending on the model available. Below are the steps you need to follow:
Step 1: Mount showerhead base.
Begin with removing the old showerhead, then using a plumber’s tape, wrap the handheld showerhead around the shower arm threads for a couple of rounds of loops. Later, screw it and tighten the base using your hands around the shower arm.
Step 2: Attach your hose.
Here, wrap handful of lops of your seal tape through a cross-tee nipple of your showerhead base. Next, direct the flexible shower hose thread onto the nipple and tighten it by hand.
Step 3: Check leaks.
Check if there are any leakages by turning on the water. If any point of connection has a leakage, tighten it carefully with channel lock pliers or use an adjustable wrench. Ensure to use a heavy piece of clothing or leather that protects the clothing.
Step 4: Mount your wall bracket.
According to this step, you have to follow the manufacturer’s guidelines as it requires mounting your wall brackets. Most times, it involves making holes in your wall to place expandable anchors.
Recommend reading: Top 8 Best Delta Faucet Shower Trim Buying Guide
How to Install a Handheld Showerhead with Cross-tee Diverter Fitting?
This method does not require any removal of the existing showerhead, on the contrary, it adds a handheld showerhead to the existing showerhead. Let’s get to know the steps to follow as detailed below:
Step 1: Install cross-tee fitting.
Remove the existing shower head from the shower arm and clean thoroughly the threads on the shower arm. Make sure before initiating the process that the water source is turned off.
After cleaning, cover the plumber’s seal tape severally around the end of a shower arm that is threaded. Take the cross-tee fitting and thread it around the shower arm. Tighten it by hand.
Step 2: Reconnect the existing showerhead.
On one side of a cross-tee fitting, wrap a plumber’s pipe seal tape around the threads. Then screw the original shower head to the cross-tee diverter. Tighten the showerhead using your hands.
Step 3: Attach a flexible hose.
At this step, take the flexible hose of the handheld showerhead and fix it on the outer of the other outlet on cross-tee fitting. Fasten the hose and tighten using your hands.
Step 4: Check for leakages.
Finally, this is a step that you get to confirm if the installation was successful, it involves checking the leakages.
Switch on the water and check if there is any leakage at the cross-tee fitting diverter you just installed. If it has no leakage, you have the go-ahead to continue. In case there are leakages on the connections, switch off the water and tighten the joints. Use an adjustable wrench. For the protection of the finish, use a piece of heavy cloth between your wrench and the hose.
Recommend reading: Top 17 Best Delta Shower Heads Reviews
Steps of Installing a Handheld Shower Head with a Tub-spout Diverter Valve.
This is where you add a handheld showerhead where there was no existence of a showerhead or where there was an old tub-spout that had no diverter. Follow these steps to effectively install a handheld shower head with a tub-spout diverter valve.
Step 1: Uninstall an old tub-spout.
First, I need to remove the existing tub spout that creates a way for the installation of a new tub spout. Different types of tub-spout are slip-on and threaded, thus having different ways of removing them.
- For a slip-on, your spout features a hex (Allen) piece setscrew. To detach, use your hex key which is a wrench to loosen your setscrew and then slide your spouts off the pipe nipple attached to the wall.
- For a threaded one, it lacks the setscrew. To detach, unscrew the spout using the channel-lock pliers until it completely moves out through the threaded nipple.
Step 2: Install a new tub-spout.
Before installing the new tub-spout, ensure that the tub-spout has the same attachment method as the old one. That is, if it was a slip on so should be new or if it was threaded, so should be new.
If it’s a slip-on, move the new tub spout and slide it through a stud-out pipe, and fasten the setscrew using an Allen wrench.
If it’s a threaded design, begin by wrapping the pipe nipple thread using a plumber’s pipe seal tape for two to three rounds in a clockwise direction. Then, screw it on the stud-out pipe.
Step 3: Mount the handheld bracket/slide bar.
In this step, mount the slider bar or mounting bracket of the handheld showerhead to the wall, by working with the manufacturer’s procedures. The activities involved in this exercise may include drilling holes on the wall that anchor the bracket with expandable anchors.
Step 4: Attach the flexible shower hose.
Wrap the plumber’s pipe seal tape around the nipple of the spout’s diverter valve and attach it to a flexible hose and ensure it’s a tight seal.
Step 5: Check leaks.
Open the tap for water to run and check the showerhead unit you have fixed for any leaks. In case the showerhead, diverter, or hose has leakages, make sure to tighten that connection precisely with your adjustable wrench or a channel-lock plier. Use a piece of leather or heavy cloth to take care of the finish.
Recommend reading: Best Overhead Shower Head Reviews
FAQ.
1. Can I add a handheld showerhead to my existing showerhead?
Yes, it is possible to add a handheld showerhead to an existing showerhead. This only requires the use of a cross-tee fitting valve diverter. This type of diverter enables you to add a handheld showerhead to your fixed shower without going to drill the walls.
Take off the existing shower head that unscrews it from its neck and add the diverter. Then, connect the existing showerhead back on.
On the other side, add a handheld showerhead on the diverter. You can only use one type of showerhead once. That is, either the handheld or the old showerhead.
The advantage of using a handheld showerhead, you can adjust the height of the hose to shower or wash your dogs comfortably. On the contrary, it enables you to bathe from the fixed shower head.
Recommend reading: Top 5 Best Delta 5 Spray Shower Head Reviews
2. How do you attach a handheld head to a hose?
A handheld showerhead can be attached to a hose. There are a variety of factors that affect the installation of a new handheld showerhead. Among the tools that you need to check before initiating the attachment include:
- Handheld shower head kit.
- Teflon tape.
- Wrench.
Below is how to attach the hose with a handheld showerhead.
Step1: Switch off the water.
Shift off the water in a local shutoff, however, if you don’t have it turn off the water in the main gate valve in front of the house or at the garage.
Step2: Add a mounting bracket.
Check if your new handheld showerhead has a backing plate and slide it on first. Secondly, sew the mounting bracket while tightening it using your hands. When connecting ensure that the hose connection is at the bottom of the bracket.
Step3: Connect the hose.
This is where you connect the hose to the mounting bracket. Be keen to connect the correct end of the bracket. The end that is screwed into the ward mostly has decorative cones.
Step4: Connect the wand.
Screw the wand to the hose where you tighten it by hand.
Step5: Check for leaks.
Switch on the water and have it run for a couple of minutes. Then check to see if the connections have any leaks at the joints. If it has, tightens it carefully using a wrench and a heavy piece of cloth for proper non-leaking joints.
Recommend reading: Top 5 Best Delta 5 Spray Shower Head Reviews
3. How often should you change your handheld shower head?
You should change the handheld showerhead two times each year. That is, in the proximity of 6 to 8 months.
Lengthy usage of handheld showerheads may be faced with hard water problems, low shower pressure, accumulation of disease-causing bacteria, etc. Due to this reason, mostly disease-causing bacteria that increase their growth in showerheads may infect the lungs of a risk patient.
The exercise, therefore, is important thus replacement will reduce the likeliness. This exercise is easy and simple where you can do it in the comfort of your home that saving on costs or hiring a professional.
Recommend reading: Best Bathroom Shower Heads Reviews
Conclusion
The handheld showerhead has become an integral part of our homes and workplaces. They are loved due to how they are versatile and enhance the bathing experience. Don’t be left behind as people are switching to this enjoyable dreamy world. The above information takes you step by step on how to accomplish its installation.
Recommend reading: Best Ceiling Mounted Rain Shower Head Reviews